


Are you looking forward to joining the School for Change Agents but feeling nervous about the virtual aspect of the course?
Every year we run the School for Change Agents virtually so that people from all over the world and anywhere in the UK can join us easily and without needing to travel. We know that not everyone is available at the same time and with an international audience, some people might be in bed asleep whilst we are broadcasting live so we make sure that the videos are available on YouTube after the session.
If you’re on shift or can’t get away then you can join us on YouTube to watch the catch up version of the live sessions, don’t worry we don’t want anyone to miss out! If you can’t access YouTube or WebEx in your organisation then have a chat with your IT department to see if you can join at work.
The Schools thriving virtual community connects at all times of day to have conversations on both Twitter and Facebook about their learning from the School. You can get involved and follow us on Twitter @Sch4Change #S4CA and on Facebook.
We’ve included a helpful guide on how to join a webex session:
When joining a WebEx meeting you will either be provided with a link, numbers to call and an access codeor (in the case of the School, these details will be sent to you via our newsletter).
Click on the link to join the meeting. This will open the session using whatever programme you have set as your default (Internet explorer, Firefox etc).
If you have never joined a WebEx before the link will prompt you to install software to enable it to run. Allow this download and the session will then open once installed (This only needs doing once, for subsequent sessions the software will run the programme without needing to install anything).
When the session starts you will see a screen looking something like this;

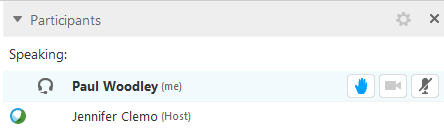
The list of those logged in will appear in the top right of the screen. Your name will appear in this list with the word ‘(me)’ in brackets next to your name (In case more than one person with your name has joined). You will also be able to see who the host of the session is by the word ‘(Host)’ next to their name and the presenter by where the WebEx Ball is.
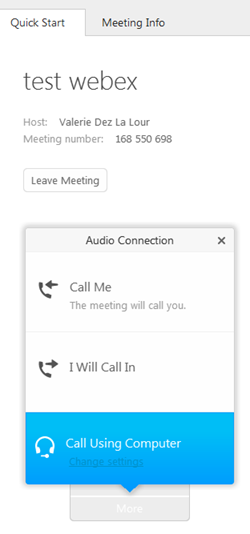
The first thing you will need to do is connect your audio. This should pop up when you join the WebEx or you can click ‘Audio’ drop down at the top left of the page. When you join you will see a grey panel ‘Call Using Computer’, ‘Call Me’ or ‘I Will Call In’. Click the option which is the most convenient option for you. If using the ‘Audio’ drop down there will be an option for ‘Audio Connection’, click this and the same options panel will appear.
Call Using Computer:
Just below this option there is an option to ‘Change settings’, click on this first.

Clicking this option will allow you to test your pc audio before joining. A new screen will option allowing you to test your speakers and microphone. Below each option there is a drop down list so you can select the appropriate kit and then a test button next to this.
Once you have tested both the speaker and microphone click OK to go back to the connection screen. You have NOT yet connected your audio, all you have done is tested the settings to make sure you can connect. To connect your audio you can now click on the ‘Call Using Computer’ option.
If you are finding that this isn't working then as with all technology, the try turning it off and on again rule applies. Leave the Webinar and join again the exact same way, this often fixes audio issues which cannot be resolved in the session.
Call Me:
Selecting this option will get WebEx to call you. You will have the option to select your country and then enter your telephone number (Do not add the country code or a zero at the start as this will already be included by the country selection). Once a number has been entered the ‘Call Me’ button will light up allowing you to connect.

Once pressed the system will call your telephone, once you pick up you will be asked to press 1 on your telephone to connect the audio.
Once connected you will then be able to speak and hear the conversation.
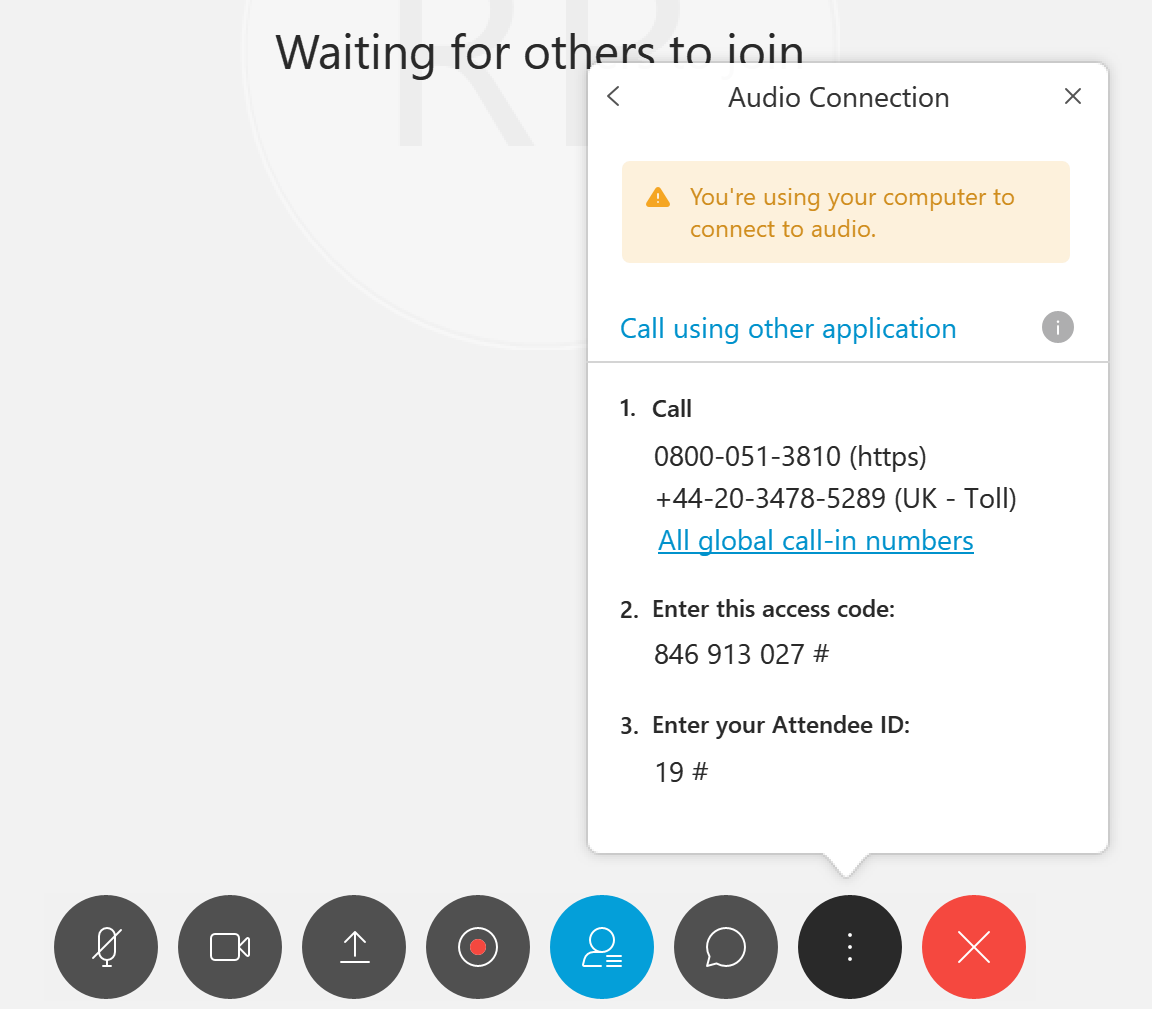
I Will Call In:
This will allow you to call WebEx rather than the system calling you. When you select this option the window below will pop up showing you the dial in details along with the access code and your attendee ID. It is important to enter your attendee ID code as this will tie your telephone to your PC so everyone else on the call will know who you are. This will also allow you to mute and be unmuted so you can speak. Dial in using the instructions on your screen.
Being an active participant
Webex’s are designed to be interactive so there are several ways in which you can participate. You can raise your hand if you wish to speak. To do this there is a raise hand symbol next to your name in the Participants panel. Simply click this and a hand icon will appear next to your name. The host or presenter will then know you wish to speak so can either unmute you or invite you to unmute yourself. When your hand is raised the icon will turn blue and appear to other attendees.
The second and more flexible communication tool is the chat option. When you join a WebEx this panel will be collapsed so you will need to open it. To do this there is a chat bubble above the Participant list. To open this simply click the button.

Once clicked this icon will turn blue and the chat panel will appear below the participant panel on the right hand side of the screen. This will allow you to post messages to others in the session. Firstly select the person (Or group) you want to send to from the drop down list above the text box. In School you will want to send your messages to 'All Participants'. If you select an individual only they will see your message so ensure you select the correct choice.
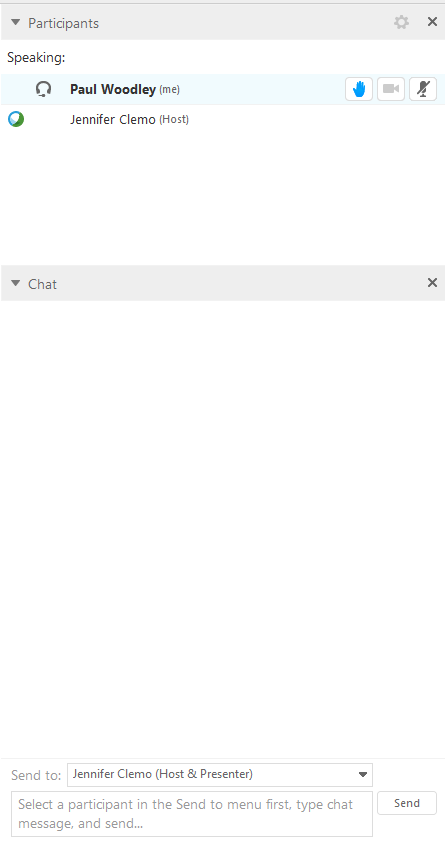
Once you have selected your recipient you can type your message. To enter text click in the box at the bottom, type your message and then click the send button. You will only see comments posted from the point you join the session and that are posted to all or you specifically so if you are late joining some conversations may not make much sense if you missed the original query or if someone posted to an individual by mistake. In School we put @RosieRedstone when addressing an individual to make it clear who you are talking to.
Viewing the presenters content
Once the session starts the presenter will normally work through a presentation. The system will be set up so this should show automatically on your screen. Any presentation will appear on the left of the screen and will move through the slides as the presenter moves them on so you will not need to worry about moving them yourself.
If you do have any problems with any aspect of the session contact the organiser if you cannot connect or send a private message to the host through the chat panel.
Muting and unmuting yourself - Please note that as we have up to 1,000 people join the School sessions live, you will automatically be muted and this section doesn't apply.
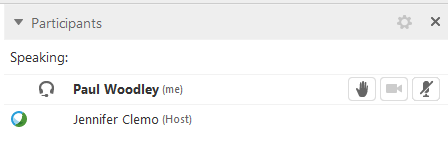
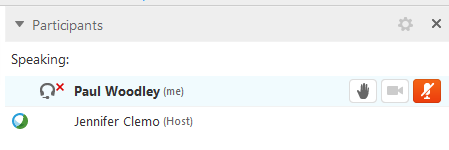
Once you have connected your audio by whatever choice you selected you will now have the ability to listen and to speak. Unless you are presenting I would advise that you mute yourself until you have something to contribute. To do this the list of participants in the top right of the screen will now show your name with an audio icon next to you name (This icon will look different depending on the type of connection) either a pair of headphones or a telephone. To mute click the microphone symbol to the right of your name. When muted this icon will be shown in red. See image below of the unmuted appearance and the muted appearance.
We hope that you've found this WebEx guide useful and we hope to see you at School!

/Passle/5a5c5fb12a1ea2042466f05f/MediaLibrary/Images/6168334917af5b10f4bf1d30/2022-04-14-15-27-52-040-62583d78f636e9115805b2d5.png)
/Passle/5a5c5fb12a1ea2042466f05f/MediaLibrary/Images/6168334917af5b10f4bf1d30/2022-08-05-09-59-36-465-62ecea08f636e906acfed639.jpg)
/Passle/5a5c5fb12a1ea2042466f05f/MediaLibrary/Images/6168334917af5b10f4bf1d30/2022-07-28-14-57-17-405-62e2a3cdf636e9180c9835cb.png)
/Passle/5a5c5fb12a1ea2042466f05f/MediaLibrary/Images/6168334917af5b10f4bf1d30/2022-07-20-10-16-56-533-62d7d618f636ea07987f6668.png)
/Passle/5a5c5fb12a1ea2042466f05f/MediaLibrary/Images/6168334917af5b10f4bf1d30/2022-07-15-09-55-32-858-62d13994f636ea1398e71aa9.jpg)